copyright Rich Lucchesi, 2006
2) Shooting Oudoors, Natural Light
Before beginning a photo shoot outdoors, walk out into your yard and find a
location that is as far away from anything bright (cars, flowers, sheds, climbing
frames etc.) as possible. That's the place to set up your table and tripod.
Having taken steps to minimize potential sources of reflection, the only issue
we need to be concerned with is finding a suitable background. The seamless
arrangement described above is less effective when used outdoors because the
ambient light is no longer directional. While it will still provide a clean,
distraction-free backdrop, it will be bathed in the same light as the glass and
this limits the ability to create contrast for the label.
There are alternatives however. Stand in your shooting location and make a slow
360-degree turn. Can you locate an area of deep shade or, failing that, a stand
of shrubs with dark-green foliage? The greater the distance between you
and the shaded area the better since any texture will blur into a pleasantly
mottled backdrop once the camera optics are tightly focused on the glass.
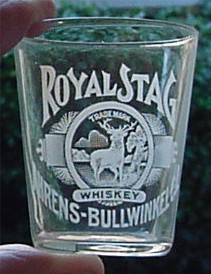
Figure 5 shows how effective this can be: it's a rare Royal Stag from
Ahrens-Bullwinkel Co. of San Francisco, a part the Rich Lucchesi collection. The practice of holding a
glass between thumb and forefinger is generally discouraged because it both
introduces distracting digits and causes motion-induced blur. You should
use your tripod and raise the shot to a convenient height above the table on a
Plexi display stand, an inverted Pyrex baking dish, or perhaps even the base of
an up-turned tumbler.
|
Figure 5. copyright Rich Lucchesi, 2006 |
The sky can also provide a convenient backdrop, although the shooting angle can
end up being extreme. Unless you happen to live on a mountain top, you will have
to create a support for the glass that is above your head and then direct the
camera lens upwards to avoid ground-level clutter.
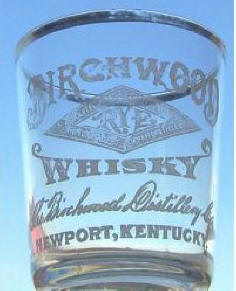
Figure 6 shows two examples gleaned from internet auctions that show how
well this technique can work. The Birchwood at left has been photographed
against the clear blue sky of a summer's day: the only distracter is the image of a red
barn sneaking in at lower left. The shot vs. sky technique works particularly
well at high altitude and during the winter months because as humidity levels
drop, the closer to an ideal blue-black the sky becomes.
The Julius Raible [Figure 6, right] has been photographed to great advantage against a deeply overcast sky, which is surprising given that this would appear to be an example of "white-on-white" syndrome that I railed against in the last Shooting Shots. The difference here is that the clouds have the sun behind them and hence are acting as a light source. This creates the necessary contrast between background and a label that is in relative shade.
|
|
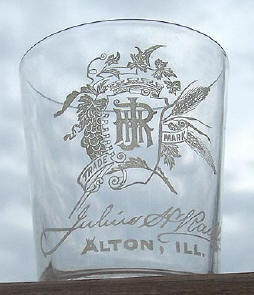 |
| Figure 6 |
3) Shooting Indoors, Artificial Light
If you need an all-weather, 24/7 way to document shots, then this is the most
convenient, although it presents its own special challenges related to the light
source.
You set up the shoot in essentially the same way as described for the indoors/natural
light scenario above. Although you don't need a room with a window,
the addition of daylight to the lighting mix does help make the final image more
natural-looking, but remember to be on your guard against reflections. If you're
in windowless room, an overhead light can be safely left on while you work.
The main source of illumination for the glass is going to be the clip-on halogen
desk lamp that I recommended in Part I of this series. I prefer a clip-on because it's easy to position and the pool of light it
creates is small and easy to control [Figure 7], but you could substitute
any number of alternatives. Position the bulb directly above the
glass at a distance of an inch or so, but don't turn it on yet.
| Figure 7. The main source of light for the indoor shoot is a clip-on halogen desk light, positioned an inch or two above the glass. Adjust the light's position forward and backward until the reflected glare disappears and the label is brightly illuminated.
|
 |
Adjust the height of the camera until the lens is on a level with the glass,
then inch it close enough to
the glass so that it fills the view screen, yet not so close that you lose the
ability to focus on the label. Depending on the ambient light and proximity of surrounding objects, you
may notice multiple bands of reflection marring the label [Figure 11, left].
Now turn on the desk light on and adjust its head while observing the glass in the view screen. You'll discover that when the lamp is shining directly down and
slightly forward of the glass, the label will light up with surprising intensity
[Figure 11, center]. If the base has become an intense white hot-spot that
obscures the lower lines, drop the camera position slightly and it should shrink to a
silver sliver.
Use of a desk lamp has two advantages. By flooding the glass with light, the
background drops into a dark, contrasting pool [Figure 7]. It also
has the advantage of providing a highly directional light source that reflects
vertically off the base toward the ceiling rather than horizontally off the walls of the glass
toward the camera lens. This allows one to
document the label in its entirety, unmarred by reflections.
There are two potential downsides to using this technique. The first again relates to reflections, or lack thereof, as shown in Figure 8.
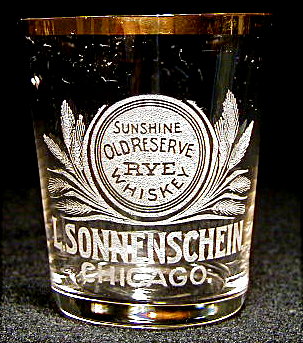 |
 |
| Figure 8 |
The figure shows two images of the same Sunshine Old Reserve glass from L Sonnenshein of Chicago, IL. The first was created under artificial lighting and while it captures the label fully, the glass appears lifeless. The image on the left made use of natural lighting and, while the reflections make some parts of the label more difficult to read, the glass sparkles with life. Glasses are supposed to be filled with reflections.
[ Turn Back a Page ] [ Back to Random Shots Index ] [ Turn to Next Page ]