Lighting: If you’ve ever seen a rainbow, then you’ll understand
that natural light is a mix of seven different colors that meld into white.
Reproducing this mix artificially is not difficult but it does require
additional expenditure so, given the cheapskate caveat above, I use natural
lighting for virtually all of my photographs.
Remembering the tendency for shot glasses to concentrate and reflect back light,
you need to be vigilant about selecting a working location that produces minimal
hot spots. If the sun is shining straight in the window, then seek out a room on
the opposite side of the house. If you choose to set up in your home office, then turn off
the computer monitor and the desk lamp.
Ideally, you need to find a room with south-facing window and pick a day when
there is a thin cover of clouds (bright overcast). If you’re shooting around 9
or 10 am, so much the better. The light under these conditions is about as perfect as
it gets – a soft natural light that produces muted reflections yet your shots
will sparkle and the gilded rims will glow. If the cloud cover is thick or heavy
with rain, then your glasses will look muddy and sullen. If waiting for perfect
light is inconvenient, then by all means skip to the
end of the article and use
the artificial lighting set-up described there.
Reflections: At this juncture, you should have a camera mounted on a tripod in your
window of choice, with you positioned between window and camera, and your shot
perched on the seamless background [Figure
3]. Position the camera lens about 9 inches from the glass and zoom in on
the label. You’ll immediately notice a reflection of the widow behind you, and
possible of you also. That’s because you’re wearing a white T-shirt and creating
a hot-spot, so go change into something dark!
In order to get rid of the reflection of the window, you’ll need to raise the
camera position by a few inches and shoot downward slightly. Look through the
view finder or view screen as you do this: you’ll see the reflection creep upward and then
disappear over the back edge of the rim [Figure 4]. Once you start
photo-documenting, you'll need to repeat this procedure for every glass because
the wall angle varies from from one shot to another.
 |
 |
 |
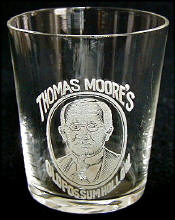 |
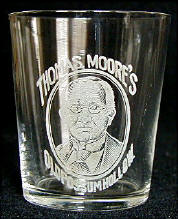
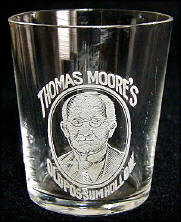
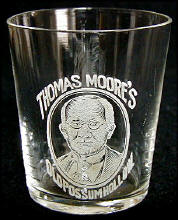
Figure 4. Effect of camera height on reflections.
The camera was inched upward in this series of images to demonstrate the
effect on reflections coming off the back wall of the glass. In the
first of the series, the details of Mr. Moore's face are lost in the glare
of the window reflection. By the third image, we have a nice clean label and yet there's still some sparkle to show that this is indeed a glass. |
Contrast: The primary goal of our photographic exercise is to render the
glass label as clearly as possible. This means maximizing contrast between label
and background. Since the light coming through the window is striking the label
head on and the background is dark, it should stand out strongly on the view
screen. If it doesn't, then there are two likely causes.
First, you may have so much light in the room that the background is no longer
sufficiently dark to provide adequate contrast. Perhaps the sun is bouncing in off the neighbor's siding, or
perhaps you have a wash of light entering via a side window. This can usually be fixed by
blocking out windows, adjusting blinds, starting earlier in the morning when the
sun is less intense or, if necessary, changing the shooting location.
Another likely cause is that the label on your glass is so badly faded that there's
nothing left to document. In such cases it may be advisable to try the artificial light
option described at the end of the article, since it can make even weak labels
readable.
[ Turn Back a Page ] [ Back to Random
Shots Index ] [ Turn to Next Page ]